- Список рубрик
- Теги этой статьи
- Новые статьи на сайте

- Самые популярные статьи
![Иллюстрация к статье Замена процессора в ноутбуке. Апгрейд процессора Intel второго и третьего поколения Core i7 [Sandy Bridge и Ivy Bridge]](/docs/zamena_processora_v_noutbuke_socket_g2/imgsocial_small.jpg)
- Последние новости


Как разобрать ноутбук Acer Aspire 5534 [ENG]

In this guide I explain how to dismantle Acer Aspire 5534 series laptops.
I will dismantle the base and remove most internal parts.
- ШАГ 1-5: Removing the hard drive, memory, DVD drive;
- ШАГ 6-12: Removing the keyboard;
- ШАГ 13-16: Removing the top cover assembly;
- ШАГ 17-25: Removing the motherboard;
- ШАГ 26-28: Removing the DC power jack.
Most likely this guide will work for some other Acer Aspire models. If this guide works for you please mention the model number in commend after the post.
ШАГ 1.
Turn off the computer and remove the battery.

Если на вашем ноутбуке «слабая» батарея (аккумулятор), держит ноутбук в работе всего несколько минут или не держит совсем, то она требует замены. Вы можете самостоятельно приобрести аккумулятор в интернет магазине и установить его в ноутбук.
ШАГ 2.
On the bottom you’ll find two covers. One is for the hard drive and another one for memory modules.
Remove screws securing both covers.
Lift up and remove both covers.

ШАГ 3.
When covers removed you can access the following components:
- both memory modules;
- hard drive;
- wireless card.
I’ll leave both memory modules connected to the motherboard.
It’s necessary to remove the wireless card only if you want to remove the motherboard. I’ll leave it connected for now. I’ll remove the wireless card in the ШАГ 18.
Remove two screws securing the hard drive.
By the way, Acer Aspire 5534 can handle up to 4GB RAM maximum. Each memory slot can handle up to 2GB memory module.

ШАГ 4.
Slide the hard drive assembly to the left and unplug it from the connector on the motherboard.
Lift up and remove the hard drive.
My Acer Aspire 5534 had a regular 2.5? SATA hard drive installed.
If you would like to replace or upgrade the hard drive, you can use any other large capacity 2.5? SATA hard drive or SSD.

ШАГ 5.
Remove one screw securing the optical DVD drive. This screw located on the left side from the wireless card.
Pull the DVD drive from the laptop and remove it.

ШАГ 6.
The keyboard is secured by six spring loaded latches on the top.

ШАГ 7.
Push the latch into the case using a small flathead screwdriver.
At the same time lift up the keyboard a little bit.
When the keyboard is lifted up, the latch will not lock.
Do the same with all remaining latches.

ШАГ 8.
Lift up the top side of the keyboard and move it towards the laptop screen.
Be careful, the keyboard ribbon cable still attached to the motherboard.

ШАГ 9.
The keyboard ribbon connector located under the keyboard.
It’s necessary to unlock the connector in order to release the cable and remove the keyboard.
I’ll show how to unlock the connector in the following two steps.

ШАГ 10.
The connector has two parts: black base which is soldered to the motherboard and brown locking tab which is a moving part.
Slide the locking tab about two millimeters to the shown direction. Do not move it any further. The locking tab must stay connected to the base.

ШАГ 11.
On the following picture the keyboard connector shown in the unlocked position.
Now you can pull the keyboard cable from the connector.

ШАГ 12.
Remove the keyboard.

Если на клавиатуре ноутбука не работают клавиши, то с вероятносью 99% клавиатуру надо будет менять на новую, чистка клавиатуры как правило не помогает. Приобрести клавиатуру к ноутбуку и установить можно самостоятельно. Например, клавиатура к Acer Aspire 5534 с доставкой обойдётся совсем недорого. Обязательно заказывайте клавиатуру для своего языка.
ШАГ 13.
Remove all screws from the bottom.

ШАГ 14.
Remove seven screws securing the top cover assembly.
Disconnect the following cables from the motherboard:
- Power button cable;
- Speaker cable;
- Touchpad cable;
- Media board cable.
On the following two pictures I explain how to unlock connectors and remove cables.

The power button cable, touchpad cable and media board cable locked in a connector as it shown on the picture.
You unlock it the same way as the keyboard harness connector.
Slide the locking tab to release the cable and after that pull cable from the connector.

The speaker cable has a regular male-female type connector.
Simply unplug the mail part from the female part.

ШАГ 15.
Start separating the top cover assembly.
If all screws on the bottom and top cover removed correctly, there shouldn’t be any problem.

ШАГ 16.
The top cover assembly has been removed.

ШАГ 17.
Under the top cover you can access the following internal components:
- Cooling fan;
- DC jack harness;
- CMOS battery (soldered to the motherboard);
- USB board;
- Laptop motherboard.

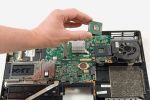
ШАГ 18.
I’ll be removing the motherboard so it’s necessary to disconnect the wireless card from the slot.
Remove one screw securing the wireless card and pull it from the slot.
It’s not necessary to disconnect wireless card antenna cables. Just be careful.

ШАГ 19.
Remove two screws securing the motherboard.
Disconnect two shown cables.

ШАГ 20.
The DC jack cable connector located on the bottom side of the motherboard.
Unplug the DC jack cable from the motherboard.

Разъём питания из-за неосторожности пользователей часто ломается, питание ноутбука не поступает и ноутбук из-за этого не включается (не реагирует на кнопку включения). В этом случае требуется замена разъема питания на новый. Новый разъем питания к ноутбуку можно заказать в интернет магазине.
ШАГ 21.
Lift up the right side of the motherboard and start removing it from the laptop base.
Be careful. The video cable still connected to the motherboard on the bottom side.

ШАГ 22.
After the motherboard removed from the base, turn it so you can access the video cable connector.

ШАГ 23.
Unplug video cable from the connector on the motherboard.

Шлейф LCD матрицы часто перегибается и нередко требует замены. Основнями признаками поломки шлейфа является «черный экран», полосы по экрану или другие дефекты изображения, которые обычно появляются в моменты открытия/закрытия ноутбука. Поломка кабеля обычно происходит в районе петель корпуса, тоненькие проводки просто переламываются и восстановить их зачастую невозможно. Новый видео-кабель (шлейф) LCD матрицы можно самостоятельно приобрести и земенить не прибегая к услугам сервисного центра.
ШАГ 24.
The Acer Aspire 5534 motherboard has been removed.

ШАГ 25.
The cooling fan mounted to the bottom side of the motherboard.
The cooling fan is attached to the heat sink but it can removed and replaced separately.

Если вентилятор ноутбука шумит, гудит или совсем не вращается, можно провести его профилактику (почистить и смазать), но данная процедура не гарантирует долгой работы кулера в будущем. Лучшим вариантом будет его замена на новый, приобрести вентилятор (кулер) к Acer Aspire 5534 и установить можно самостоятельно.
ШАГ 26.
Remove one screw securing the USB board.

ШАГ 27.
Move the USB board aside so you can access the DC jack harness.

ШАГ 28.
Remove the DC jack harness.

If you would like to know how to remove the screen, check out this replacement guide. It should be pretty close to Acer Aspire 5534 laptop.
Всё! Ноутбук разобран. Сборка происходит в обратном порядке, если у вас возникнут сложности вы всегда можете обратиться к специалистам.
Все ссылки на комплектующие к данному ноутбуку:
Источник: www.insidemylaptop.com
Теги этой статьи


Карта разрушений и жертв российской агрессии в городе Мариуполь, на карте отмечены более 2000 пострадавших домов. На карте отмечены не только фото домов, но свидетельства их жителей, а так же место боевых...

Из-за военных событий 2014 года в Донецке тренер по плаванию Алексей Снежко и его жена вынужденно переехали в Киев. А теперь, в 2022-м, 33-летний Алексей потерял обоих родителей в Мариуполе. Как пережить...

«20 днів у Маріуполі». Ще один фільм про блокадний Маріуполь з подіями березня 2022 року. Повномасштабне російське вторгнення в Україну журналісти зустріли у Маріуполі разом із жителями міста...